(PS:如果你想用来翻墙,请确定你的服务器在国外!)
利用ssh连接远程VPS
Mac OS X 或 Linux 下直接在终端中输入
[终端代码]1
| ssh root@your_vps_ip -p your_ssh_port
|
将命令中的参数替换成你的服务器对应的参数:
如root为用户名,your_vps_ip为服务器ip,your_ssh_port为服务器端口,一般为22
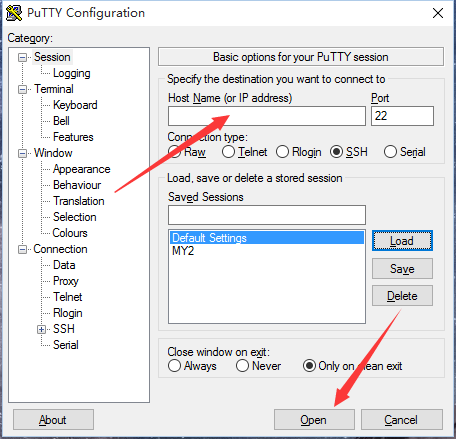
如果是Windows客户端的话,请使用PuTTy软件,网上能够直接找到
然后直接输入服务器的密码就可以了,不同的VPS提供商第一次登陆会有不同的要求,一般在你创建了服务器后会发一封邮件给到你的邮箱提供默认密码,然后第一次登陆的话会要求你修改一次密码,只需要按着提示走就可以了
安装Shadowsocks服务器
登陆完毕后,如果服务器是
Debian/Ubuntu:
执行下列代码
[终端代码]1 2 3
| apt-get install python-pip pip install shadowsocks apt-get install python-m2crypto
|
CentOS:
[终端代码]1 2 3 4
| yum install python-setuptools easy_install pip pip install shadowsocks yum install python-m2crypto
|
配置Shadowsocks服务器
安装完毕,接下来就是写好配置文件:
先是配置ipv4的翻墙方式
vi /etc/config.json
按i进入insert模式并输入一下内容
[config.json文件的配置]1 2 3 4 5 6 7
| { "server":"x.x.x.x", "server_port":xxxx, "password":"xxxx", "timeout":600, "method":"aes-256-cfb" }
|
输入完毕按ESC键退出输入模式,然后输入
:wq
然后回车
上面除了server要填自己的VPS的ip外x均可以自己随意配置,另外如果你的VPS开启了防火墙的话,记得开启你的上面设置的端口(server_port),一般刚申请的VPS没做过什么操作的话可以直接配置就行了,暂时不必管防火墙。
接下来是ipv6的配置文件
vi /etc/config6.json
按i进入insert模式并输入一下内容
[config6.json文件的配置]1 2 3 4 5 6 7
| { "server":"x.x.x.x", "server_port":xxxx, "password":"xxxx", "timeout":600, "method":"aes-256-cfb" }
|
注意这里的端口不要重复,server处填的ip要为ipv6的格式
输入完毕按ESC键退出输入模式,然后输入
:wq
然后回车
接下来设置开机启动ss:
[终端]1 2 3 4 5 6 7 8 9 10 11 12 13 14
| { vi /etc/rc.local 然后在文件里加入这两行(操作方法与上面一样,按i插入,插入完按ESC然后输入:wq回车) 插入的两行: nohup /usr/local/bin/ssserver -c /etc/config.json -d start --pid-file ss1.pid nohup /usr/local/bin/ssserver -c /etc/config6.json -d start --pid-file ss2.pid 保存完后 再在终端这种执行上面2段语句: nohup /usr/local/bin/ssserver -c /etc/config.json -d start --pid-file ss1.pid nohup /usr/local/bin/ssserver -c /etc/config6.json -d start --pid-file ss2.pid 终止命令: ssserver -c /etc/config.json -d stop --pid-file ss1.pid ssserver -c /etc/config.json -d stop --pid-file ss2.pid }
|
至此你只需要在手机和电脑上使用ss客户端,就可以科学上网啦!